Monday, March 7, 2011

A Quick Strawberry Vaps!


As a rule, I try not to type when I’m eating sweet things. But, I’m taking a huge risk tonight as I indulge in the results of one of my many vaps while my tongue continues to curl and caress a remaining bite of ripe, chocolate covered strawberry in my mouth.

No, I didn’t order them from somewhere fancy. I made them myself. No recipe. No instructions. Just a vaps, spurred by the memories of seeing – not eating – chocolate covered strawberries on television and being advertised online.

The strawberries sitting in my fridge were not meant to be eaten right away, either; I was saving them to make strawberry muffins. But, in rearranging the contents of the fridge after sharing some leftovers for dinner, I found a little bit of bittersweet chocolate chips from the last set of chocolate muffins I had made – months ago, I might add – and started wondering what I could do with them until I purchased more cocoa to make said muffins again.

They were less than a handful, about a 1/3 of a cup at most, and still tasty. My tub of strawberries beckoned… ‘Just take a few and try a thing, Halcie…’

So, I washed a handful and drained them…

Next, I put the chocolate chips in a microwaveable bowl and put them to heat for a full minute. I started stirring them while the bowl was still warm…

Then I put them back in and heated them at 15 second intervals until they were nicely melted.


The next step was to pat the strawberries dry…


And dip them in one by one.


Of course, not all of them came out as cute as this one, but I tried!


Arranged them on some wax paper on a plate…

Which went into the refrigerator to chill for a bit.

Out they came!

So Delicious! (Yup, I took a bite out of the bigger one instead!)

That was truly one of the more tasty vaps I’ve had, or experienced. Wanna try them yourself? Here's my vaps recipe.

Chocolate Covered Strawberries

8 to 10 strawberries
1/3 to ½ cup bittersweet or semisweet chocolate chips

Wash your strawberries and drain off the excess water.
Put the chocolate chips into a microwaveable bowl and heat for 60 seconds.
Remove from the microwave and start stirring them while the bowl is still warm.
Put them back in the microwave and heat at 15 second intervals, stirring after each until the chocolate is melted.
Blot any excess water off the strawberries and dip them halfway into the melted chocolate. (You can use a spoon to slather the chocolate over them if necessary.)
Cover a plate with wax paper and then place each dipped strawberry on it.
Put them in the fridge for about ½ an hour, or until the chocolate has firmed up.
Enjoy at your leisure!

I’ll admit this was definitely worth the effort. The taste was just as I imagined too, darkly sweet at first from the chocolate, then the strawberry taste mingles with the dark and spikes it with tart sweetness… yum! No wonder people crave this combination so much! 

Well, I definitely plan on doing more chocolate experiments with pears, bananas and other fruit, but for now, I will just relax and indulge…
Oh, and in case you’re wondering, I still have enough left over to make my strawberry muffins!

Take care, my friends, and like I always say, doh forget to mind de pot! :-)


Saturday, March 5, 2011

Saaaaaaalt Fish...


Carnival is in the air. There are so many local foods associated with the season, from potato pies to rotis (and we can’t forget the unofficial “official” food of T&T, a nice tasty pigeon peas pelau) but I don’t think that none can beat the perfect breakfast of Salt fish Bujol (sometimes spelled as Brulejol) and… well… anything!


Back in the day, salt fish (made by salting and preserving cod) was often referred to as a poor man’s food, but as anyone can now attest, it has now become “Mr.” Salt fish, meaning that the price has risen to give it 'status' among other high priced foods. Today you can find salted shark and pollock in abundance. However, as all Trinidadians know, it’s taken quite a few knocks because the very word is synonymous with the slang for a woman’s ahem … nether regions…

Still, this is one of those breakfasts that many pay through the nose to enjoy at a local food stand or cafĂ©, where it’s served up in a hot roast or fried bake or sada roti and splashed with ketchup and peppersauce.  I thank God that my late Granny had a flair for making all kinds of things with salted fish, including cod puffs and salt fish stew, and her specialty, scrambled eggs and salt fish.

No one however, can take away my happy memories of my Granny and her long handled blue enamel potspoon, which I can still hear knocking around her Pyrex dish as she’d mix up the saltfish buljol before handing me a plate with a handful of Crix from the biscuit drum. Eaten with a nice fried bake and drunk with a warm cup of sweet tea or coffee is my favourite way to start a weekend morn, and it’s even better enjoyed when a couple slices of ripe zaboca (avocado) join the party.

Many people think that a good Saltfish Buljol is a complicated thing to make, but as you will soon realise, it’s as easy as the famous double entendre calypso by the Mighty Sparrow… sing it with me now… “Saaaaaaalt Fish… it sweeter than meat, when is time to eat, baby… all saltfish sweet!” 


First, you get your salt fish and place it in some water. Put it on a medium high flame and let it boil for 10 minutes – that will get most of the salt out of it.

Cut up a few blades of chive…

Then slice a medium onion, cut up two tomatoes and also a couple of pimento peppers. The pimentoes are optional; I just happen to love them in my buljol!

By the time you’re through doing that, your salt fish should be boiling.

Strain it off in your rice strainer or colander and let it cool a bit. Taste a piece of it to make sure that enough salt has come out, or your buljol will be ‘brinejol’.
(If it’s still too salty, boil again for about 5 minutes.)

Now you can do this part with your hands, but I need mine for the photos, hence the two forks. Just use them (or your fingers) to shred the salt fish nicely.


Add the onions and pimento and mix them in.

Next comes the chive…

Followed by the tomato.

Give it all a good stir; see how it’s starting to look like the finished product? But we’re not done yet!

Now for the “must have” magic ingredient… olive oil. I should note that I’ve tried making a salt fish buljol with other kinds of oil, but the taste never comes out the same.

(This next step can be pretty dangerous, so I must tell you that this is OPTIONAL. You don’t have to do this, but this is how I saw my Granny do it, so I’ve continued the tradition.)
Heat the olive oil in a potspoon over your stove’s flame until is starts to shimmer.

Next, pour it onto the salt fish, you’ll hear it give a nice sizzle… However, DO NOT use the same potspoon you used to heat the oil to stir, otherwise the fish will stick to it.

If you have it, add in a little minced habanero for a bit of heat, then stir it up and let it sit for a few minutes so the flavours can meld together… and there you have it! Your very own bowl of salt fish buljol!

Curious? Here’s the full recipe!

Salt fish Buljol.

A 250 g pack of salted fish (shark, cod or pollock)
1 medium onion, sliced thinly
2 bulbs chive, chopped
2 pimento peppers, chopped (optional)
2 medium sized tomatoes, chopped
1 potspoonful (or 1½ tablespoons) olive oil (you have the option to warm it up)
A 1 inch piece of yellow habanero pepper, minced fine (optional)

Method:

Boil the salted fish for about 10 minutes and then drain in a colander or rice strainer. (Taste for saltiness. If still too salty, boil for another 5 minutes.)
Shred it with your fingers, then add in the onion, pimento, chives and tomatoes and stir.
Add in the olive oil (you can choose to heat it up on an open flame in a potspoon) and stir with a fresh spoon.
Add in the minced habanero (optional) and stir again. Let it sit for a few minutes for the flavours to meld together.
Serve on some warm sada roti, fried or roast bake or with some Crix.

 
And thus ends my salt fish buljol sojourn. Keep in mind that there are as many versions of buljol as there are lovers of the dish, and you will come across a few variations that have garlic, chadon beni, sweet peppers or even grated carrot. All are fine in their own right, because for some it’s a matter of preference. This recipe, however, is as easy as it gets. Have fun trying it and let me know how it comes out. Don’t forget to leave me a word or two, and as I always say, doh forget to mind de pot!  Take care!  :-)

Saturday, February 19, 2011

Making Whoopie... Pies, that is!


Makin Whoopie… pies, that is…

Sometime before Valentine’s I was increasingly feeling the urge to bake. As was my wont, I headed to watch TV, and on the History Channel, they were talking about the Amish people of Pennsylvania and their favourite snack, the Whoopie pie. It’s really a "cookie sandwich" with a nice sweet filling such as marshmallow fluff (or crème), buttercream, or cream cheese frosting. I had never seen anything like it before and the entire process had me fascinated as I watched them being put together, first by Amish women and then by a couple of bakeries, and wondered if I could do the same.


So, I began researching these beautiful looking treats online. I soon realised that there are as many recipe flavours for whoopie pies (like pumpkin, ginger, coffee, etc) as there are bakers, so it took me a while to find one that would really ‘work’ for my style of baking, which follows two simple rules:

  1. Make whatever it is from ingredients that you always HAVE in the house (like all purpose flour, butter, vanilla essence, etc.) I hate searching for overly expensive specialty ingredients, lol!
  2. If it contains some weird ingredient you can’t afford (or find) in T&T, forget it.
And as luck would have it, I found a recipe for red velvet whoopie pies and did a road test, hoping to blog about them. Unfortunately, though they tasted great, they came out looking like saucers instead of the beautiful domes I was looking for, simply because I had over beaten the batter in the food processor. (Note to self: mix it the old fashioned way next time.)

So, I decided to try again, this time with a different flavour - vanilla. Unfortunately, disaster struck again, not with the look, but this time in the taste department. …
(Second note to self: re-read recipe and double check the words “baking powder” and “baking soda”… too much of the latter makes baked goods bitter.)

Never one to give up, another recipe was discovered online, this time for dark chocolate whoopies. A simple list of ingredients and the easy prep encouraged me, so much so that I even went as far as to make an orange frosting to go with them… check out the bacchanal that followed! 


Okay… in here are a mix of sifted all purpose flour, unsweetened cocoa (I love Cadbury’s Cocoa for my baking purposes), salt and baking soda – don’t worry, I double checked!


Using a wooden spoon, I worked some Blue Band butter and some Cookeen shortening together with a cup of brown sugar…


Then I broke out the hand mixer to beat the mix until it almost doubled, after which I added one large egg and some vanilla essence.


Next, I added the milk and flour by halves and started mixing like a madwoman… this is the result. The batter is pretty solid and you can stand your spoon in it easily.


I dropped the mix by heaping tablespoonfuls onto wax papered jumbo baking sheets. These things will spread out, so leave at least 2 inches of space between them. I was able to get 12 of these to fit easily. This bowl gives you 24 total to make 12 whoopies.


All done! See? Told you they spread out. You can use a flat spatula to get them off the paper and on to a cooling rack, but be careful or else they’ll break apart on you.


While they cooled, I worked on the orange frosting.

Butter, orange zest, icing sugar… you beat the orange zest and butter first, though… I just thought I’d pose these things together for you all, lol.


Second stage: adding the icing sugar by spoonfuls and beating them in.


Third stage: incorporating a couple tablespoonfuls of fresh squeezed orange juice into the mix.


The finished product. The colour came about by adding in some yellow and red food colouring. I was aiming for orange, but it came out like this instead, but it worked for me.


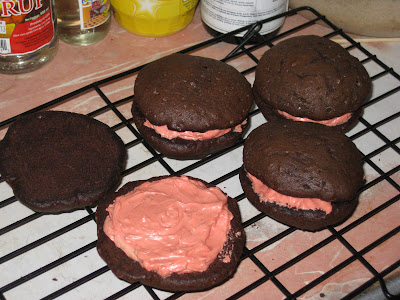
Now for the fun part… makin’ whoopie! Just size them up and look for twos that have similar shapes and dimensions.


Slather on some frosting on one half…


Then cover with the other and repeat! You just made whoopie! Here’s the full online recipe, taken from onevanillabean.com, which in turn was adapted from the Whoopie Pies cookbook (the link below takes you to the book for sale at Amazon.com).

Chocolate Cake for Whoopie Pie, adapted from Whoopie Pies
1 2/3 cup all purpose flour
2/3 cup unsweetened cocoa powder
1 ½ teaspoons baking soda
½ teaspoon salt
4 tablespoons unsalted butter, at room temperature
4 tablespoons vegetable shortening
1 cup dark brown sugar
1 large egg
1 teaspoon vanilla extract
1 cup milk

1. Pre-heat oven to 375°F.
2. Sift flour, cocoa powder, baking soda and salt into a bowl.
3. In the bowl of an electric mixer, beat together butter, shortening, and sugar until fluffy. Add egg and vanilla and beat until well incorporated. Beat in half the flour mixture, and then half of the milk. Repeat with the rest of the flour and milk.
4. Line 2 cookie sheets with parchment paper or Silpats. Using a 1 tablespoon scoop (or a 1 tablespoon measuring spoon) drop mix on cookie sheets about 2 inches apart. Rap cookie sheet against counter so that the mixture spreads out a little bit.
5. Bake the cakes in the middle rack of the oven, one cookie sheet at a time for *10 minutes. Let cakes cool on the cookie sheet for about 5 minutes before transferring to a rack.

*Halcie’s note: When I baked mine at the temperature and time suggested in the recipe, they were not done. I’d suggest baking for about 15 to 18 minutes maximum, because at 10 minutes they are still somewhat gooey. Test with a skewer or toothpick after 15 minutes; when it comes out clean and the tops spring back when touched, they’re done.

Orange Frosting (made with real orange juice)
¾ cup butter, softened
2 teaspoons grated orange rind
2 to 2 1/2 cups icing sugar
2 to 3 tablespoons fresh squeezed orange juice
Orange food colouring (optional)

  • Beat butter and orange rind at medium speed with an electric hand mixer until creamy.
  • Gradually add in the icing sugar, beating until well blended.
  • Stir in 2 tablespoons orange juice, adding additional orange juice if necessary to reach the desired consistency.
  • Stir in a little orange food colouring for desired colour. 


Thus ends my whoopie adventure... for now, at least!
As a side note, I ended up baking some and took them to work on Valentine’s day, and they were happily gobbled up. These are sure to become a regular staple at my house, but I have made a mental promise to myself to attempt the vanilla whoopies once more. I mean, take a look at what could have been…

I know, right? Great colour and texture, but not the taste. I still think of them as the whoopies that went "WHOOPS!"
 

Anyways, time for me to go. Don’t forget to leave a comment or two to let me know you passed by. Thanks again for visiting, and like I always say, don’t forget to mind the pot!