Monday, March 26, 2012

Pigeon Pea Soup: Just like Granny used to Make!

Hi everyone, I hope you are all well. Haven't written for a while, but that's only because of the job's demands. My food adventures have not stopped, however, and today's blog deals with one of those ingredients that I hadn't interacted with in years... fresh pigeon peas!


A few weeks ago, I had come home from work to a really surprising sight: Errol was on the couch shelling (opening) pigeon peas, seen here... (aren't they gorgeous?)

He told me that a woman was going around St. Clair, selling them for TT$20 for three pounds, which he couldn’t pass up. (So glad he didn’t!) It had been ‘donkey years’ since we shelled fresh pigeon peas, and from the moment I had grabbed the first pod I was catapulted back to my youth, sitting on the floor with my Granny as she sat and shelled from the handful she had placed in her skirt, and me, always imitating and trying in vain to shell and hold the plucked peas in her hand just she did. My small hands couldn’t hold as many, obviously, and I always got angry when peas kept dropping. She would say, “Halcy, mind what you doing,” and I would reply meekly with a quick “Yes Granny,” and marvel at her hands moving like a machine… reach, open, pull… reach, open, pull… when she eventually released the peas she held captive in her palm, the sound of the them hitting the bowl was like no other on earth.
That night, as I watched the antics of the guys on Big Bang Theory, I took pleasure in making my own sounds as I scattered my own into the bowl. I’m sure Granny would have been pleased, hahahaaa!

When the following Saturday came, I thought long and hard about what I was going to do with them. It eventually hit me after a long rainy morning: a classic pigeon pea soup – well, Granny’s version anyway. A quick trip to the corner shop for a couple of ‘special’ ingredients and I was ready to get started on my trip down memory lane…

I started with two cups of the shelled pigeon peas. They were washed, and placed in a pot with 4 cups of water to boil with two crushed cloves of garlic.

While that was going on, I squeezed the juice of half a lemon over a pound of fresh cubed beef – straight from the supermarket.

Now for the special ingredient; the salted beef. Got this at the Chinese supermarket just a corner away. Soaked in brine, it does assault the nostrils, but trust me when I tell you it gives a 'something special' to traditional Trini soups like this one. I used about a quarter of it (roughly a cupful). I just cut a few slices and took off the excess fat, then cut them in a rough dice. They were also washed with lemon juice and then…

They went straight into a waiting hot pan. No oil was used because the remaining fat rendered off and kept it from sticking, plus I kept them moving with my spatula and let the pieces cook for about 3 minutes or so. 
Meanwhile, the fresh beef was placed into my pressure cooker with a tablespoon of vegetable oil and browned lightly. As soon as it 'changed colour'...

In went the salted beef to join the fresh beef. Both cooked for another couple of minutes, then I added 2 cups of water to the pan and cooked them under pressure for 15 minutes. 
(Then it was time to check on the boiling pigeon peas...)

The pigeon peas were going well here. The garlic was close to disintegrating and the grains were losing their lovely colours – I always wish they didn’t disappear, hahaha!

Next, I added the softened meats and their liquid to the boiled pigeon peas and stirred them together, and sprinkled in half a packet of coconut milk powder.

As you can see, the pigeon peas are not at the ‘burst’ stage as yet, but they did soften up nicely.

Soon it was time for the other ingredients to join the party. I put in the provisions and vegetables first; I had peeled and cut up 3 sweet potatoes, 4 regular potatoes and 2 cups of pumpkin. Next I added in 2 stalks of chopped chive, 1 large stalk of local celery, 5 green and red pimento peppers and half a medium onion (only had red in the fridge), followed by a couple sprigs of some fresh parsley and a little bunch of fresh thyme, which Granny always added whole. Then I just stirred it all and let it go for 10 minutes so the provisions and veggies can cook.

After ten minutes, I checked the consistency of the provisions, which were going well, so I gave it a taste and began to season the pot. This is an earthy soup, which means the flavours are all about comfort, so nothing too crazy went in here.  A teaspoon of salt, a little shake of black pepper, 1/2 teaspoon of red pepper flakes and a teaspoon or two of brown sugar. Then the pot was closed again and left to thicken on medium heat for another 10 to 15 minutes.

At last, it was cooked to perfection. To thicken it some more, I took the back of my potspoon and pressed some of the softened peas against the sides of the pot, stirring gently. Tasted it again, of course... and pronounced it "well done."
(The aromas that came from this gently bubbling of pot pigeon pea soup was truly the most beautiful smell ever, I swear.)

Ta-dah! Here's the finished dish; my lovely bowl of Pigeon Pea soup.

Had to dive right in!

So there you have it, a classic pigeon pea soup that’s guaranteed to make you remember the good old days. Everyone thoroughly enjoyed this one and I thanked my lucky stars that I only cooked half of the pigeon peas. I still have the remainder in the freezer, so when the vaps hits me again, I can whip it up at will. 

Hope you enjoyed my trip down memory lane and I look forward to sharing another food adventure with you. If you want the detailed recipe for this, I will be glad to send it to you; just email me at naiclah@gmail.com. 

 Take care of yourselves as always and don’t forget to mind the pot!

Sunday, March 11, 2012

A Trini 'Tambran' Sauce


Tamarinds are back in season, and my boy was in his glee when he came back from an outing with some of his buddies and dropped a plastic bag filled with the brown pods in the kitchen some time ago.
Plus, with all the hoopla with the Garlic Sauce song for Garnival, I couldn’t wait to enjoy my own tamarind sauce, or as we say in Trinidad, ‘tambran’, and I love a tambran sauce too bad!

Today you can find tamarind juice in your grocery store or local food court, but the most common thing we do in Trinidad and Tobago is mix the pulp with sugar and make them into balls, which you can find for sale at any grocery, parlor or snack vendor. We even used to buy tamarind stew, which is also a favourite of mine to eat with fish or, as Errol experimented with last Christmas, baked turkey.

The one I’m demonstrating here – a nice pourable tambran sauce – is my real fave, just because it goes best with some bake and shark, doubles or pholourie. 

Here's how I did it...


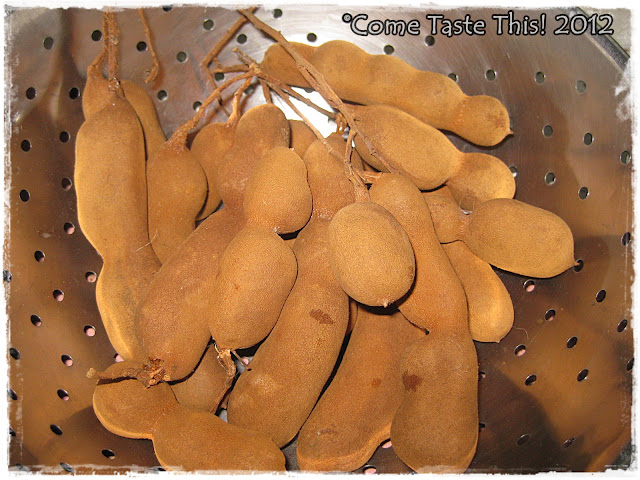
Here's the tamarind pods...

Cracked open the shells to reveal the tart, flesh covered seeds.

Rinsed off the shelled tamarind. Poured on some hot water and let it sit for a few minutes, then I pressed the pods with a potato masher until the flesh loosened and the seeds separated.

To cut the acidity, I added in a 1/2 teaspoon of baking soda. However, I erred by not doing it by quarter teaspoonfuls, because it foamed up big time, hahahahaa! No worry, it soon relaxed itself.

Added a cup of brown sugar and kept mixing, then I put in a pinch of salt, a little of my home blend of green seasoning and some pepper sauce. And that, as we say...

...was that. Delicious Tamarind Sauce, ready to eat.


Poured it into clean glass jars and placed them in the refrigerator.

Enjoy your 'tambran' sauce with your favourite foods, anytime!

Halcian's Tamarind Sauce (not Stew)

10 ripe tamarinds, shelled and de-veined
2 to 3 cups hot water (plus ¼ cup extra)
½ teaspoon baking soda
1 cup brown sugar
1 tiny pinch of salt
1 to 2 teaspoons green seasonings (store bought or home made)
A few dashes Tabasco sauce or local pepper sauce (optional)

Here's how to make it:
  • Rinse the shelled tamarind in a colander or rice strainer to get rid of any fine bits of shell.
  • Place the tamarind into a large glass measuring cup (or other dish), and pour the hot water over it and let it steep for about 5 minutes.
  • Using a potato masher, press the tamarind against the bottom of the dish and ‘work’ it around so that it releases the pulp into the water. (It will start thickening as you continue to move it around and the seeds will separate themselves).
  • Sprinkle on the baking soda (it will start bubbling and frothing as it makes contact with the acid). Quickly stir it into the hot pulp until it disappears. This will help cut some of the sourness.
  • Add in the cup of brown sugar and continue to work the tamarind until it dissolves as well.
  • Sprinkle in the pinch of salt and mix in 1 teaspoon of green seasoning. Taste and adjust your seasonings, checking for acidity and sweetness. At this point, you can also add the extra ¼ cup of warm water to ‘loosen’ it up if it’s too thick.
  • For some extra heat, add a little Tabasco or local pepper sauce (to your taste) and sample again.
  • Decant into a glass bottle – seeds and all. 

Hope you enjoyed this one! Til my next recipe, take care, and don't forget to mind the pot!

Saturday, March 3, 2012

Some “Hurry Down” Lentils


Food writer Nigella Lawson once said that a friend of hers described her as “the queen of the frozen pea”, simply because she had so many recipes in which she used them. Now in no way do I compare myself to Nigella (hahahaaa!), but we do share a love for peas and I’ll admit, I do have more than my own fair share of recipes for cooking different types. However, it’s the lentil that gets my top vote for the most used pea in my little kitchen.

Lentils are like my ‘go to’ pulse because they cook quickly and can be used as anything from a meat substitute to a delicious side dish. I like to think that love stemmed from my late Granny’s cooking, because of the special way she used to stew them and she always served them up with some nice macaroni pie… (more on that in another post). Of course, we don’t always have the luxury of standing over the pot and doing the sauté, so over the years I’ve been able to develop an easier way of doing stewed lentils using a pressure cooker.

It’s a pretty healthy way to do them too, because there’s no oil or butter used. All you need are lentils, water, a flavour cube or two, some nice firm fresh vegetables and your favourite local and powdered seasonings and you’re good to go. It’s no wonder I like to refer to these as my “Hurry Down Lentils” because they are really fast and easy, and I’m only too happy to show you how I do them.

First thing I always do is check through the 500g pack of lentils and search for any debris, strange looking grains or stones.
(I cannot in good conscience ever just pour lentils straight from the pack and start prepping, which is why I hardly ever buy cooked lentils on the outside. You never know…)

See what I mean?

The next step was to give them a good wash; after that, they were poured into the pressure cooker.

Next, I got my vegetables. I like to use fresh celery, pumpkin and carrots whenever I can. Luckily, I had these on hand, so I peeled and diced half of a medium sized carrot and enough pumpkin to make 1 ½ cups. I also added half an onion, sliced, 3 stalks of chopped chive, 1 large stalk of chopped celery and a few sprigs of fresh parsley.

Now for the seasonings… I’ll admit I took some anger out on 2 large garlic cloves by flattening them with a knife – and my fist. Gave them a rough chop and added them to the pot, followed by 5 chopped pimento peppers.

In goes 6 cups of water…

A couple dashes of Angostura Bitters…

 And a little less than a potspoonful of good tomato ketchup beginning with the letter ‘M’.

Two crushed vegetable bouillon cubes went in. (But if you like, a teaspoon of salt can suffice.) Also put in some crushed red pepper flakes, a couple shakes of ginger powder and a teaspoon of brown sugar.

I didn’t have any bay leaves – normally I’d put a small one in there –  so I reached for the stand in… a teeny bit of ground nutmeg.

Gave everything a good stir, and realised I almost forgot something…

A spoonful of home made seasoning. (Cue the angel voices…)

Another stir and my pressure cooker was ready to go on the stove. Placed it on a medium high flame and brought it to a quick boil, then locked my lid closed and cooked it down for roughly 18 minutes, timing it from the moment the top began to spin and make that noise…

And when the time was up and the pressure cooker cooled down, this was the sight that greeted me… voila!

Perfectly stewed lentils, or as we say at my house, ‘Hurry Dong lentils!’

Here's the recipe: 

“Hurry Down” Lentils

One 500g pack of dried lentils, picked over for stones and washed
Half a large carrot, peeled and diced
Enough chopped pumpkin to give you 1 ½ to 2 cups
1 stalk celery, chopped
3 stalks chive, chopped
2 sprigs fresh parsley, uncut
4 or 5 pimento peppers, chopped
½ a medium onion, sliced
2 large cloves garlic, crushed with a knife and roughly chopped
2 dashes Angostura bitters
A little less than a potspoonful of tomato ketchup
2 Maggi vegetable bouillon cubes, crushed
½ teaspoon red pepper flakes
½ to 1 teaspoon ginger powder
1 teaspoon brown sugar
1 small bay leaf (or ¼ teaspoon of ground nutmeg)
1 heaped tablespoon of home made green seasoning (if you don’t have home made, you can used store bought)
6 to 7 cups water

Method
  • Simply add all the ingredients to your pressure cooker, pouring on the water last.  
  • Stir everything together and put to boil on medium high heat.
  • When it begins to boil, lock the pressure cooker lid and let it cook for approximately 15 to 18 minutes.
  • After cooking, release the steam from the pressure cooker and gently stir the pot; taste the lentils for seasoning and adjust by adding more salt or a little pepper sauce for some added heat.
Serve with rice, stewed meat or fish.


Truth be told, we enjoy our lentils cooked this way so much at home that sometimes we even eat it on slices of bread. Really, this is one of the easiest ways you can do lentils if you don’t want to worry with soaking them beforehand. Cooked under pressure, they get really tender and soft with a nice gravy-like sauce, and eating them like that is nothing short of enjoyable.

Well, time for me to take a little rest, and I'll leave you with the promise that more delicious dishes are going to be featured soon. 
Enjoy trying out the recipe my friends, and like I always say, don’t forget to mind the pot.