Saturday, December 22, 2012

Bring out De Ham!


Well yes, the Yuletide season is here. The frenzy of buying, giving, cooking, cleaning and working ourselves harder on Christmas week than we did for the other 340-odd days of the year is ‘orn like boil corn!’
It’s funny that after promising myself that I would forego the cooking part this year, I once again found myself longing for the creature comforts of a childhood Christmas. Since posting about soaking the fruits for the black cake (and I’m glad to say they have attained maximum plumpness in that alcohol), the quest was on to fulfil other tastes. I didn’t have to go very far this time, since a trip to a certain store to get my new laptop resulted in an unexpected gift of a bottle of wine and a very hefty ham. While happy I wouldn’t have to buy one, the ham was certainly a surprise, because it’s actually the biggest one we’ve ever had come through my kitchen.

After leaving it to thaw for a day, we had to guess its weight, which for some strange reason was left off the wrapper. Enter Errol, who promptly began doing bicep curls with the thing.
He: “I say is about 10 pounds, man. Look how meh pecs pulling!”
Me: *Dr. Evil voice* “Riiiiiiiiiiiiiiight!” (Then I broke into a giggle fit that lasted for some time.)

Anyway, we soon saw our porcine treasure boasted a low sodium label. Nice! But the skin that covered him was anything but healthy and I imagined what that would look like as the heat melted it… not a pretty sight, right? It’s a good thing Errol was there, because the next step would have proved impossible by myself (especially while trying to wield a camera.) So, Errol grabbed the closest knife and started to perform some surgery on Mr. Ham.


After taking the wrapper and the netting off the ham, I patted it dry with some paper towels so the operation wouldn’t be too slippery. That thick covering of skin was split open by Errol and sliced away.

The now nude ham was scored in a diamond cross hatch pattern. Didn’t go too deep, about a quarter inch was a good depth to work with.

Next, a handful of cloves. I inserted each one into the corners of each diamond, ensuring a delicious stab of spicy flavour.

Tore off two long sheets of foil (enough to envelop the ham completely) and crossed them over each other. The clove studded ham was then placed in the centre of the cross and the flaps were brought over it and squeezed tightly to seal it. I then got my baking sheet and placed my foil roaster on top of it to steady it. (These roasters aren’t exactly strong so they need a flat surface, especially when cooking something heavy.)

Here’s the foil covered ham in the roaster, which was placed into a waiting 350°F oven. When baking hams, the general rule is 20 to 25 minutes per pound. At a ‘guestimate’ of ten pounds, this one was baked for nearly three hours.

Here it is after the first 2 ½ hours of baking. As you can see, there are some fat drippings on the bottom of the roaster. (Imagine how it would’ve look if I had left the skin on… the ham would be doing a greasy breast stroke! Hahahahaaaa!)

Out it came for the next step. Using tongs, I removed the foil – you can imagine the scent that hit me! Now the ham was still pretty pale, and definitely needed to get some colour, soooo….

I mixed up some ketchup, Angostura bitters, oyster sauce, ginger powder and honey mustard… I just wanted something different from the sweet glazes. This low sodium ham needed some spice!

Brushed it on carefully. A few cloves popped out, but I stuck them back in. Back to the oven it went – uncovered – so it could get the colour it needed  for the remaining time.

TA-DAH!!! My beautiful Christmas Ham!

Of course, we had to take a taste!

There it was. Our lovely ham, perfectly done and making the house smell like Christmas past. Using my home seasoning blend coupled with the cloves gave it a taste and smell that was out of this world. So you can imagine the scene, having to literally stop ourselves from taking taste after taste after taste…

(For the record, this ham on toast with chow-chow and pepper sauce? BESS!!!

So, on that note, thanks again for taking a peep at my cooking adventures. Lots more to come this Holiday season, and I’m looking forward to sharing.

Take care, everyone, and like I always say, don’t forget to mind the pot!


Sunday, December 9, 2012

Soaking in Rum and Wine


Another long absence, but I am finally present. How have you all been?

Feeling glad to be here again. The usual job stresses multiplied a million fold; such are the perils of working in the media. So, I made a deal with myself to jump back into my other love, which is cooking and creating delicious things to eat and enjoy.

This year, I am going to revisit my Granny’s special black cake. It’s one that I have really fond memories of, because when I was little, she used to bake them on order for family, friends and clients. As was the custom of “employing” the children around to keep them out of trouble, I was her helper. I would break the eggs for her, peel the lime rind, measure the flour, sugar and butter… and I can never forget the sound of her wooden spoon scraping against the giant white plastic bucket she used to mix the batter. Incidentally, her son (my late uncle) was a boss cake maker himself, and I used to look forward to when he visited, because they would have an annual cake exchange. He would make a black cake especially for her, and she’d make one for him. They would sit together in the kitchen at the old wooden table, and cut a slice from each other’s cakes, sip on some ginger beer and chat about their recipes and whatever else struck their fancy.

And so, I am getting the ball rolling. Step one – getting the preserved fruits together for the soaking process – is always a fun one for me. Step two? Come take a look and see.


The stars of this cake are prunes, mixed peel (citron), raisins, and glazed fruits. I’m using just 8 ounces of each for my cakes.

Can’t forget the bottle of maraschino cherries, now!

The next step was to wash and de-seed the prunes. I gave the raisins a good washing as well. Back in the day Granny would spread the fruits on a platter and put them out in the sun to dry. I dispensed with this step since it was rainy. (By the way, that remainder of raisins won’t be going to waste… pastelles will soon be calling!)

Next, I opened the packs of glazed fruits and mixed peel. The bottle of cherries was opened, drained and cut into fourths.

Got my giant bowl and potspoon and mixed all the fruits together into a bright, colourful mass.
My giant 62 ounce glass bottle was on the ready, having been cleaned well beforehand. I also had another smaller bottle as a backup, just in case. So, I started spooning the fruit in.

Rule number 34… always fill the bottle to roughly three quarters with fruit. This is because that preserved fruit is going to be sucking in that alcohol which will make it swell, and when things swell, they require room. Thus, the backup bottle was called in to hold the remainder. Like its big brother, it too was filled to three quarters of the way.

And here are the big boys… Fernandes Black Label dark rum and Charlie’s Red Spanish Wine. These are the only two things Granny soaked her fruits in. If she couldn’t find Charlie’s, she would use Cherry brandy, but Charlie’s was always her first pick.

In my bowl, the dark rum and the Spanish wine were combined and then decanted into the waiting bottles of fruit. 

Hmmm… looks like this bottle’s getting all tipsy!

Lastly, I covered the bottles tightly and gently tilted them from side to side to make sure all the fruit can move around. And that was that. 


As it stands, I will be checking on them every day to see how they’re doing. They will soak for at least a week to 10 days or so, but they will be good to go by the time I’m ready to bake the cakes.
Since putting these bottles down, the levels of the fruits have already risen a couple of inches, believe it or not. Take a look for yourself.

The fruits are rising!


See why we left that space? Grannies always know what they’re talking about!

And so, I hope you enjoyed sharing this part of the black cake prep. There will be more steps to come and I plan to document them all for you to enjoy. 

Take care, my dears, and like I always say, doh forget to mind the pot!


Sunday, October 7, 2012

Pulled Pork from my Crock Pot


This should have been last week’s posting, but I think old age is catching up with me because I was just too tired from the “9 to 5-plus” to do any writing… or that could have been the “itis” I experienced after enjoying my meal.

You see that Sunday, I was feeling – make that craving – some sweetly seasoned pork, but I didn’t want to eat it the usual way. You know how we Trinis usually do it… we season it really nicely with some fresh herbs, brown it down in a lovely stew and serve it with some rice or provisions. But nah… instead, I wanted to season it, cook it and eat it with bread.

(Yeah, I’m weird like that sometimes…)

My weapon or choice? My crock pot (also known as a slow cooker).

My choice cut? The pork loin, the most tender cut of the pig. You can bake it, stew it, roast it or (as I was about to do), slow cook it to perfection. Right then and there, however, I thought I would try an experiment and deviate from my usual seasoning methods and go for something like a ginger-barbecue flavour.

Wanna see how it went down? Follow me… 


Gathered up my arsenal of (un)usual suspects. As you can see, they’re not your typical Trini seasonings, other than the thyme, onion, garlic and pimento peppers, right? Also, I had some barbecue sauce on standby… this is a pulled pork filling, not so?

Next, I got the lovely loin out and admired its beauty. *huge grin*

Cut up the loin and began the seasoning process with some salt and lemon juice. 

Next came the allspice and ginger powder, soy sauce, Angostura bitters, a couple dashes of ginger sauce, and a tablespoon of brown sugar. I let it sit for about half an hour.  
I then started building my layers in the crock pot. I sliced the onion into rings and spread them on the bottom and added the halved pimento peppers on top of that. Next came the seasoned pork loin to cover the peppers and onions.

After that, I separated the thyme and placed the sprigs on the meat, along with 3 smashed cloves of garlic. Sprinkled in some red pepper flakes for a little heat. Poured about half the apple juice (drank the rest, ha-ha) and lastly, the marinade liquid.
(It’s a Trini thing; yuh done know!) 

The crock pot was covered. I put the heat on high, and cooked it for 3 to 4 hours or so. When I opened it, I was greeted with the most amazing aroma, and I was able to pull off a piece of meat with my tongs with hardly any effort. So, out it came to be pulled apart with two forks.

All done. But wait, there’s more!

I took a potspoonful of the liquid, plus some of the solids (pimento peppers, garlic, etc) and added them to the pulled pork (along with a cup or so of barbecue sauce) and mixed it together.

Voila! My pulled pork was ready for presentation.

A simple toasted yellow sesame seed bun was all I needed. A couple of good sized forkfuls of meat, some cooked onions and a few dashes of Tabasco sauce.

There you have it; my deliciously perfect pulled pork sandwich. Care for a bite?

Crock pot love was paramount with this dish, I’ll can tell you. It's the best feeling in the world when you don’t have to stand and 'turn a pot' and let something else do the cooking for you. And I must say again, this pulled pork sandwich was truly delicious. Leftovers didn’t stay long in the fridge either, because I ended up using them in a couple of pulled pork omelettes later in the week. Versatile? Oh yeah baby!

So that's it for today's posting. Hope you enjoyed this one, and I hope to meet up with you again for another culinary romp in my little kitchen.
Take care of yourselves, and like I always say, don’t forget to mind the pot!


Friday, August 31, 2012

It’s Corn Soup Time!


Happy 50th Anniversary of Independence, Trinidad and Tobago!

Yes, we are 50 years old today, and the nation is in the throes of celebrating becoming an independent nation.

Am I celebrating? Yes, in my own way, with television, my standing fan and my comfy bed. I am also thankful that I am not in the office today. Really, I felt like I had to change my address at one point and move into my desk, but I digress….

I must apologise for not being able to do the weekly blog thing; it has truly become impossible now. This month has been both trying and difficult. However, thankfully, I am eager to see what the next month will bring foodwise and I am able to give some love to my kitchen again.

Today’s food of choice is actually something that’s my huzzy Errol’s specialty, and it’s none other than corn soup.

Corn soup is something that is inherently Trinbagonian and can be made in so many ways to accommodate different palates. I’ve done it without salted beef, or using coconut milk instead of plain water, or even added a can of creamed corn to it to enhance the taste. There are both meat and veggie versions. Some folk start them off with yellow split peas. Some use channa (chick peas). They’ve been provision filled or broth-like, or even had little dumplings floating in them… yup… it’s that kind of soup, and I love it no matter which way it’s prepared.

Now, this version of corn soup is Errol’s personal favourite recipe and it has been shared with many of our friends in various settings, from weddings to limes (get togethers) at home. I had to seek permission to share it here, of course – you know how these fellas can be with their special dishes, hahahaaa! Now, if you’re seeing something different from what you’re accustomed to, don’t fret. Every household has their own method of preparing something they love. My corn soup is different from his, yours is different from mine, and so on. The main thing (I always say), is that you cook with love and every dish you are preparing will reward you tenfold.
 
So, here’s how Errol 'turns his pot' of provision filled corn soup…


Like every pot before, his corn soup started off with fresh corn from “de man with the truck”. Approximately 10 to 12 were peeled (or shucked as the North Americans say) and the silk (or strings as WE say), removed.


The next step was the chopping the corn into slices, about an inch thick. I started with a regular sharp knife, but soon moved on to the ‘Chinee-chopper’. KYAAAAH!!!

See? All chopped up.


Next, I got 1 cup of yellow split peas, washed it and put it to boil in about 2 ½  cups of water, a teaspoon of salt and a teaspoon of baking powder – an old trick to help soften the peas quickly.

While that was happening, Errol and I got to peeling and chopping up the provisions and vegetables for our soup. Five green bananas from our tree, 4 red skinned potatoes, 2 huge sweet potatoes and 2 ripe plantains, were prepared and put into a bowl.

We had run out of pumpkin, so we used butternut squash instead, and also chopped up two carrots (which I forgot to snap a photo of – silly me!).

Fresh seasonings were prepared next. A bunch of chive, a bunch of chadon beni (culantro) leaves, 2 stalks local celery, a large bunch of fresh thyme, 4 large garlic cloves and 5 pimento peppers were chopped.


As soon as that was done, the giant soup pot – aka large pressure cooker – was 2/3 filled with water and the corn and provisions (green bananas, ripe plantains, regular and sweet potatoes) were put in to boil for 5 to 8 minutes.


By this time the yellow split peas had finished cooking and were nice and soft, with swollen grains that yielded easily when pressed with a finger. These were strained and added to the pot.


Next to go in were the fresh seasonings, followed by the butternut squash, carrots and thyme leaves; everything was gently stirred and cooked for another 5 to 8 minutes.


While that was going on, Errol prepared the salted meat next. Washed thoroughly with lime juice, it was de-fatted and cut into small pieces and brought to the pot.

The corn soup is bubbling away!


All that was left to do was season the pot. Salt, brown sugar, red pepper flakes, black pepper and onion powder were added; the pot was covered and left to simmer for a few more minutes. The final product is seen below.

Care for a bowlful? :-)

And that, as we say, was that. One giant pot of deliciously filling corn soup.
It just hit me that I’m sure that later today this dish will most likely be sold on the street – that’s the beauty of our foods, they can fit in anywhere, any time for any celebration.

Here’s to Independent Trinbagonians everywhere, my friends. Thanks for checking out this day’s offering, and like I always say… doh forget to mind the pot!

Enjoy.


Wednesday, August 1, 2012

Making Zesty Ground Seasoning

It’s Emancipation Day today, a day where Trinbagonians commemorate emancipation from slavery. Rather than take in the celebrations going on throughout the land, I’m celebrating my emancipation from the office and enjoying some more freedom in the kitchen instead.

Now I know that time and time again on this blog of mine, you’ve been seeing me add spoonfuls of a unique combination of blended herbs to my stews, soups and rice dishes. It’s my own version of what we call ground seasoning, which I always keep on standby. Interestingly, what we call seasoning is what North Americans would probably consider to be regular herbs and vegetables, since we use things like thyme, celery and peppers in there, and they are not really flavouring agents. We local cooks however, have been able to turn these simple “herbs and vegetables” into concoctions that have been flavouring many a curried, stewed or baked dish for years, all of which have you licking your fingers.

I used to think that it was just a Trini thing to have a little bottle of that special something hidden away in the fridge, but I know now that it’s a cook’s thing. The Spanish have their blends, the Barbadians have their blends, Dominicans have their blends… you see what I mean? And when it comes to my own blends, they are never ever the same combinations in a row, simply because I don’t always get the same kinds of fresh herbs each time (given availability or weather fluctuations). But the one constant is that I always do it with love – like every other dish I make.

On this occasion, Errol managed to find a huge bunch of seasonings at the market that included some classic favourites including Spanish thyme, which used to grow in our back yard when I was little and Granny practiced her sweet hand cooking. (I swear, the thing looked like a giant green bridal bouquet, and he even presented it to me as such!)
Cradling the greenery in my hands, I took my time to assess what I was about to work with this instance… here’s how it went down.

My giant bouquet of seasonings and accompanying pimento peppers seemed like a task to separate and wash, but I’m an old hand at this.

So, here’s what I was dealing with. Rosemary (top left), oregano (bottom left), parsley (top right) and Spanish thyme (bottom right), plus the bunch of chives they were attached to…

Plus there was chadon beni (top left), regular thyme (bottom left), local celery (top right) and pimento peppers (bottom right).

My next step was to separate everything and wash each seasoning ingredient thoroughly. I didn’t use all in the bouquet; there definitely were some leftover bits that went into the fridge.
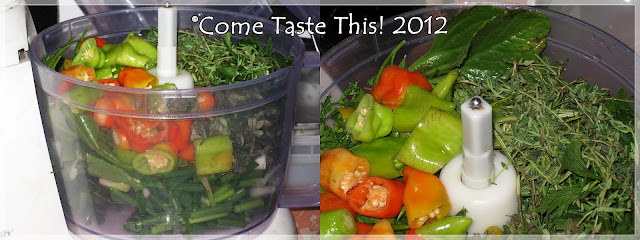
After chopping the chives, chadon beni, parsley, celery and pimentoes, and de-leafing the oregano, regular thyme and whatever else was necessary, everything was placed into my waiting food processor and pulsed a couple of times.

While still at a rough chop, I peeled and chopped up 5 cloves of garlic and added them to the processor and pulsed everything again.

Now for the preservatives… I poured in roughly ½ cup of molasses vinegar and 2 capfuls of rum, followed by a tablespoonful of table salt… and pulsed it again.

All done and ready to decant into a clean waiting glass bottle.

VOILA!


Home made ground seasoning, ready for use in your soups, stews and other lovely dishes!


Like I mentioned before, the seasoning combinations used here tend to change according to what I get. Sometimes, to switch things up, I would add in a hot pepper (minus the seeds), or some fresh, peeled ginger. Some of you may also be wondering why I haven’t used an onion in this, but that’s because I noticed that they tend to break down faster than the rest of herbs. As a result, the seasoning got discoloured after a few days, so I don’t blend them in the mix. I’d chop and add them separately when cooking. 

Once you keep the glass bottle tightly closed and in the refrigerator, the seasoning should last a few weeks; however mine is usually gone before week three. Also, I tend to either shake it out or use a clean plastic spoon or fork to take some out, just so it doesn’t get tainted for any reason.

Well, I hope you enjoyed my take on ground seasonings. If you decide to try making some yourself, let me know how it goes, okay?

So, until next time, take care of yourselves and don’t forget to mind the pot!