Saturday, August 20, 2011

De Neighbour Caused a Fry Bake…


My friends, I don’t know if this is just a vaps or last night’s hunger operating here, but I have just finished munching on a classic Trini staple, fried bake and cheese.

You see, last night I was chilling out in my room as usual when I heard some activity and noises coming from the back house next door. Then I smelled what the activity was all about. Fried bakes were sizzling. The smell alone… people… it pelted me back to my Granny standing in front our old mustard coloured Consol stove (humming away) as she delicately turned her bakes over with a fork.

Funny enough, because she made bread so often, she would always run out of yeast by the time she felt for a fried bake, so the one I remember well is her baking powder version, which I loved because they were flaky and soft. (Don’t worry, I appreciate a chewy bake as well!)

So, into the kitchen I went to make my own noise. I wonder what my neighbour will think when she begins to smell my own? Hmmmm! 

Started with just 2 cups of flour, which I sifted.
Added two teaspoons baking powder and one of salt, then whisked all together.

Got 4 ounces (about a half pack) of Cookeen margarine, chopped it up and added it to the flour. (As a side note, I should mention that my Granny sometimes used half margarine and half regular butter (2 ounces each) in this.)

(My daughter Leja took over photography duty at this point, lol!)
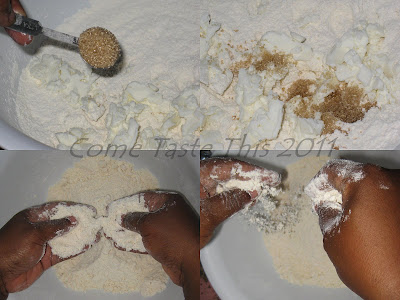
 Sprinkled on a teaspoon of sugar and used my fingers to break down the margarine until the flour looked like breadcrumbs.

Next, I got my potspoon for the mixing, then added less than a cup of (room temperature) water. Remember, there’s no yeast, so you don’t need to have warm water going in this. I stirred it with the spoon until it came together – sticky – then sprinkled on a ¼ cup more flour so I could start kneading it lightly.
 Keeping the bowl steady, I gathered the dough and folded it on itself, then just pushed it off with my palm, over and over again.

As the flour worked itself in, the dough got less and less tacky, so just a little more flour was needed for the final bit. As you see here, the dough got even smoother and the sides of the bowl were cleaned. All that needed to be done was to just smooth out the ball of dough and set it in the bowl.

Sprayed the top of it with a little cooking spray (so it doesn’t get hard) and then covered it with a kitchen towel and let it rest for about 15 minutes to half an hour. It won’t really rise, but wondrous things will be definitely be taking place!

Rolling out the dough was simple. I just shaped it into a long sausage, cut it in half, then cut each half into four to get 8 bakes. If you like, you can just pinch off bits of dough instead and roll them into balls.

Next, I took a ball of dough and flattened it with my fingers. Added some flour to the board and then rolled it to about a 5 to 6 inch wide circle with about a ¼ inch of thickness.
Heated about 2 cups of oil in my pan (medium flame) and put my bakes on standby.

Into the hot oil they went. In no time at all, they puffed up like little balloons and when the bottoms became golden brown, I turned them over. When shallow frying like this, I tend to keep the pan moving so they puff up even faster. You can even use a spoon to baste the top of the bake as it cooks.
(And yes, the smell in my kitchen was heavenly!)

As we say, “in two-twos, the fry bake done”!

How do I enjoy my bake? With cheese and some home made local pepper sauce! Yummy!

Breakfast was BESSSSS! The bakes were nice and flaky and the cheese just melted into them… wow. Those fried bakes had me feeling like Granny was right there with me in the kitchen again… no lie. *smiles warmly* 
It really felt good to go back in time with this one, even if it took sniffing my neighbur’s cooking to do it, hahahaa!

Thus ends another cooking adventure and I look forward to sharing even more kitchen hi-jinks. Take care of yourselves in the meantime and don’t forget to mind de pot!

Monday, August 15, 2011

Obsessed with Shrimp balls!


Recently, my daughter and I attended a wedding with a difference.
It was very small and intimate, and there was hardly a dry eye in the house. It had taken place at Jaffa at the Oval. The food (in my opinion) was truly delicious and though I didn’t put many things on my plate, I fell in love with the Grouper en Croute, Chicken Cacciatore and a true favourite of mine, a savoury pineapple chow.

However, I was particularly fascinated with one of the hors d'oeuvres served before dinner. It looked simple and unassuming enough, sitting there with its plastic sword skewer. When I picked one up and dipped it in the silver bowl of ruby and amber coloured dip and took it to my lips, the flavour combo woke up every taste bud in my mouth. They were shrimp balls, paired with a sweet, hot dipping sauce (that I learned later was a type of chilli paste). Even as I met with Chef Joe Brown afterward to thank him for his lovely spread, I neglected to ask about the recipe, but all was not lost. I think my daughter and I had sampled enough for our foodie brains to figure out what went into them.

After scribbling down some of my own notes and making sure I had what I needed in my fridge and food bins, I was ready to experiment with making my own shrimp balls. Let the games begin!


First, I got about 40 raw shrimp that needed to be cleaned, peeled and de-veined. I wish I could have photographed the step by step, but with hands in wet shrimp, it was next to impossible to wield my trusty camera. So, here’s the before and after.

Next, I opened up a small can of pink salmon and added a little apple cider vinegar to it.

I cut some seasonings (onion, chadon beni, parsley and thyme) and put them in the food processor, followed by the shrimp and the salmon. Everything was pulsed to a nice paste.

Next up were an egg white, 5 tablespoons of cornstarch, a teaspoon each of sugar and salt, a tablespoon of grated ginger, some onion powder and a couple tablespoons of cooking wine. Unfortunately, I hadn’t any garlic or garlic powder in the house – that’s why the onion powder came to the party.
(Of course, we couldn’t forget the ‘magic touch’!)

Everything was blended together well; and now, on to some frying action!

Got my medium saucepan and poured about 4 cups of oil into it for some deep frying. I carefully dropped heaping teaspoon sized balls into the hot oil, where they sank to the bottom at first, then happily floated upwards. I kept them moving with my spoon and turned them over from time to time so they cooked evenly (about 2 minutes). When they got to a nice golden brown, I pulled them out, and began another batch.

However, I noticed that as they cooled, they shrank a bit, but that was to be expected; this mix doesn’t have flour or baking powder in it. Still, they looked delicious, and I was done in no time!

Here you go; Halcie’s Shrimp (and Salmon) balls!

Gave myself a lovely reward!

 
And that was that. My shrimp obsession was satisfied, at least for the time being. The smell alone brought out the rest of the household and these shrimp balls were eaten for lunch, snacked on and… well, let’s just say I have to wait until my next grocery shopping day to get myself some more shrimp. The best part was that taste wise, they were at least 89 per cent close to the ones I had at Jaffa at the Oval, but I’ve promised myself to continue my shrimp experiment over time, possibly trying out ones with baking powder and even try making an oven baked version as well.

So, thus ends my latest adventure and I look forward sharing more of my cooking experiments with you. In the meantime, take care and like I always say… don’t forget to mind the pot!