Sunday, December 8, 2013

"Make a bread"

The year is not so new anymore, but that isn’t stopping me from bringing you greetings and best wishes!

If you’ve been wondering what happened to me, I’ll tell you. I have been super, super busy with work and home and – best of all – my old kitchen is finally getting re-done. It’s been slow going since the weekends are the only times we can do a little bit of work, but thankfully we are getting there. For about six weeks I was unable to cook anything, and it felt like I was  going through withdrawal, actually. However, before the old tabletops and counters were demolished, I was able to do a few recipes, which will also explain why you'll still be seeing the old kitchen, lol.

This week, I am giving everyone something they have been asking me to do on this forum for a long time now, and that’s how to make a good loaf of homemade bread.

Whenever I think of homemade bread, I think of Granny. I can’t help it. She’s the one who called me to stand next to her when she measured the flour. She's the one who let me put the ingredients in. She’s also the one who would pinch off little pieces of dough for me to play with, like plasticine, and I’d make tiny little animals out of them and hide them under the bed. Of course, the ants would find them first… but I digress. 

Now this bread recipe in particular is something that I developed from Granny’s tried and true method of rubbing both butter and lard in the flour, then adding the milk, the water, the yeast, the salt and the sugar. I decided to start heating things up in a little saucepan – before getting the microwave, of course. But I’m getting ahead of myself here. 

In breaking with tradition, I am listing the ingredients first, so here goes....

For two loaves you will need…

½ cup milk (you can also use skimmed milk if you want to)
3 tablespoons sugar (brown or white, it doesn't matter)
2 teaspoons salt
3 tablespoons butter
1 ½ cups warm water
4 ½ teaspoons instant yeast
5-6 cups all-purpose flour - but measure out 4 cups separately as you may not use all six

(For my two loaves, I replaced a cup of all-purpose with whole wheat flour.)

In a small saucepan over low heat (or in a microwaveable dish or cup in your microwave, which I did here), add the milk, sugar, salt and butter and heat until the butter melts. Cool to lukewarm.
Next, in a large bowl, pour in the 1 ½ cups warm water and sprinkle in the 4 ½ teaspoons of instant yeast: do not mix it; just leave it until it’s frothy. (This will take about 5 minutes.)
Add the lukewarm butter mixture to your yeast, followed by 4 cups of the flour; gently begin mixing it with a large spoon. The dough will gradually get very sticky. 
As you continue to mix, just add in the remaining flour by half cupfuls. (Be sure to leave a ½ cup behind for flouring your kneading surface.) Now, I chose to knead the dough in the same bowl instead of doing it on a board. I just folded the dough over on itself repeatedly until it became smooth - it took about 6 minutes or so. 
As you can see, there were some ends of flour in the bowl, but I threw them out as they just weren't 'coming in' to the ball. Eventually, the dough got nicely smooth and elastic. Next, I got two bowls and sprayed them with some cooking spray. (You can use oil or butter if you like.) I placed my dough ball into it and swirled it around so the ball was coated with the oil. This way it won't get that hard plastic looking "shell" as it rises.

I sprayed the second bowl with the cooking spray and covered the dough and put it to rise. The rising process takes about 30 minutes in a warm place. However, sometimes the kitchen is not that warm to begin with. So, what I did was to light my oven at 350°F for just a minute, then turned it off and placed the bowls in the oven.
Check that out! What did I tell you? The oven trick is a life-saver. It looks just like a beautiful cloud!
So, after it rose, I just took my fist and punched it to knock out the air... watching it deflate is a little sad, but the end result of this always puts a smile on my face! The dough then went back into the big bowl and I simply gave it a couple turns for a few seconds to gather it into a ball. 
With my little scraper I cut the ball in half – this would make my two loaves. I took each one, shaped it into a loaf and pinched the ends closed - this part is what goes on the bottom of the loaf pan.
Speaking of loaf pans, you'll be needing two 8" x 4" or 9" x 5" ones... I used the latter and sprayed mine well with the cooking spray and put the two loaves into them. Once again, I left them to rise for 30 minutes. This part is called proving, and it gives those nice air bubbles in the bread that makes it all spongy and springy.
See how nice they've risen? All I had to do was put them to bake in a preheated 400°F oven for 30 to 35 minutes. 

Voila! All done. 

After baking, I removed the loaves from their pans and gently tapped the bottoms; once they're done, you get a hollow sound.

See how the seam looks when it's baked?

Next, they were placed on my cooling racks to cool. (Don’t ever, ever leave them in the pans to cool, because condensation will make the bread bottoms damp, and we don't want that!

Of course, the next step was the cut into a loaf and spread on some "I Can't Believe it's not Butter" and enjoy. Needless to say, these loaves disappeared fast. 

With Christmas almost upon us, I will definitely be doing this recipe again so we can have something to eat with the baked ham, which incidentally, is a perfect match up for this. (Hey, Granny knew what she was doing!)

Hope you enjoyed this recipe. Until next we meet again - and like I always say - don't forget to mind the pot!

Saturday, August 3, 2013

Bring on the Garlic Sauce!!!

It took me some time, but thank goodness I can finally say the words again… Garlic Sauce!


If you’re confused, I’ll quickly explain. Back in 2012, local calypsonian All Rounder sang a “witty ditty” about his ahem... "affection" for the condiment. Now, here at home, we love garlic sauce and most food eateries have it on the ready with the usual ketchup, mustard and peppersauce. With the advent of All Rounder’s song however, the humorous double entendre was just a bit too much... 

If you’re wondering about the song, here is a link to the video. 

Trust me, the video is comparatively tamer than his live performance of the song, and believe me when I say that it’s the live performance that put me off eating (and even making) my own garlic sauce for a few months well. (Luckily, I have a very understanding family.)

Well, enough time has passed and I have been making my sauce again. Now when it comes to the actual dressing, nearly every household has their own version. Mine is a personal combination of sweetness and tanginess with a good bit of fresh herbs for flavour, and every time I make it, it disappears really fast. (I’ve actually eaten this on Crix crackers too… it’s that good.


Wanna see how the goodness comes together? Read on.

I used roughly 10 to 12 cloves of garlic to make this sauce. I peeled them, cut the root end off and chopped them in half before putting them into my mini chopper.


Next, I took one green pimento pepper, cut it in half, then de-seeded it. It was also chopped roughly and dropped into the mini chopper.


The next three ingredients were a good sized stalk of chive, three leaves of chadon beni and a little fresh thyme. Just like before, I chopped the first two and then peeled off the leaves from the thyme and added them to the rest of ingredients.


A juicy lime was cut and squeezed to give me two tablespoons of juice. This was followed by a level tablespoon of brown sugar – more will be added to taste – and then about ½ to ¾ cup of mayonnaise.

Lastly, a teensy pinch of salt went in.


It was then covered and whizzed, then checked for consistency and flavour. Another level tablespoon of brown sugar was added, plus a tablespoon or two of tap water to loosen it up a bit before whizzing again.  


Perfect. It was then decanted into my measuring cup. As you can see, this gives you roughly less than a full cup of sauce.

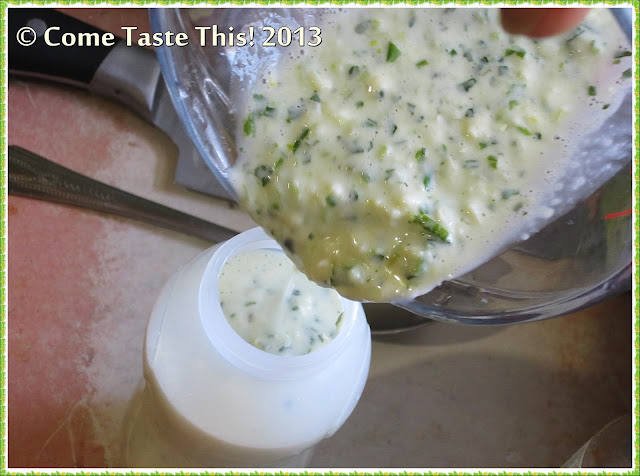
I simply poured the delicious sauce into my squeeze bottle. Yum!

Beforehand, I had prepped ingredients for my festive salad: white cabbage, carrot, cucumber, purple cabbage, green pimento peppers, romaine lettuce, celery and red sweet peppers. Everything was tossed together and chilled so they remained as crisp as possible.
A little salad was added to my plate, and the tasty garlic sauce was squeezed on… absolutely delicious! 

As you can see, mine was still pretty chunky, but you can take it further if you like for a finer grind. This sauce can stay in the refrigerator for up to a month, but believe me… my family never leaves any behind for that long.  Enjoy it on anything. We love putting it on salads and fish, but fries, potato salad or boiled provisions taste great with it too.

So, here’s to another cooking adventure, and I hope that you give this sauce a try. Have fun and like I always say, don’t forget to mind the pot!
Wednesday, June 5, 2013

Egg Fried Rice - My Way!

It’s been a long time since sharing my kitchen happenings, I know. 

Truth be told, I was going through a rough patch, both family wise and health wise. I won’t go into too much detail, but I will say that thankfully, things have levelled off and I thank God for that.
I will confess, though… I thought of letting my little blog go. But I had an intervention from one of our country’s foremost food bloggers… if you’ve ever visited Simply Trini Cooking for a quick recipe for one of our local dishes, then you know who I am talking about. Mr. Felix Padilla himself.

It was truly an honour to chat with him, and when I tell you that we talked about food for more than 4 hours straight, you must know. In that time, he reminded me why we food bloggers need to keep doing what we are doing, and that real food love never dies. We Trinis are an inventive people, and the very meals we prepare are a testimony to that. It’s necessary to see how others do things, so we can always learn and also compare.

“Please don’t stop blogging,” he had told me. “You have to continue.”
I gave him my word.
Now I had no idea at all what my new subject was going to be, but then it hit me when I was trying to figure out a simple side to go with some oven barbecued chicken I was making, and knowing the vegetarian child I have, it had to be something that could also stand on its own. And then I saw the leftover cooked white rice I had in the fridge and realised that I had a good bit of fresh vegetables to play with, the results of which you are seeing here today with my entry for June 2013, my version of egg fried rice, which went a little something like this…

One thing I realised is that when you’re making fried rice, there’s a lot of chopping involved. Here you see a carrot that was diced really small, 2 stalks imported celery (chopped), a small bunch of chive (chopped) and three red pimento peppers (chopped). I also diced up a small onion (not photographed) and had a cup of thawed frozen green peas (also not photographed).

Next, I diced up some ginger to make about 3 tablespoons or so, plus 3 large cloves of fresh garlic.
I opened up a can of baby corn and cut them into chunks.


The next things to prep were the wet ingredients; two eggs, oyster sauce and some light soy sauce. The eggs were beaten until fluffy. Unfortunately, the oyster sauce I had was literally ‘on its last’, so I simply added a few tablespoons to the bottle and swished it about so every last bit of it came out the bottle. 

Now for the cooking…
I got my old, faithful saucepan, placed it on medium heat and added a little olive oil to it. I poured in the eggs – did not season them at all – and let them cook. A soon as they were set, I folded them over like an omelette, and set it aside on a plate. I then took my knife and cut it up into small pieces so they would be ready for the second to last step.

The same pan then received a potspoonful of soya oil, and was placed on medium high heat. I added in the ginger, garlic, carrots and onions and let them cook for a couple of minutes so the carrots would get a head start. Next came ¾ of the chopped pimento peppers and all the chopped celery, followed by the green peas. Everything was stirred and cooked for a couple more minutes.
Next came the cold cooked white rice; it was stirred in carefully so everything was evenly blended. (You can imagine the lovely scent coming through the kitchen…)

Now this next part went pretty fast. In went the mixed soy sauce and oyster sauce, the cut up baby corn, the remainder of pimento peppers, the chopped fried egg and ¾ of the chopped chives. Everything was gently, yet quickly stirred  for a minute or two and taken off the flame.
And next thing you know, POT DONE. All it needed was the remainder of chives to be placed in the middle.
I enjoyed this delicious and fragrant rice with two pieces of the oven barbecued chicken, a little cooked barbecue sauce and a quick salad of romaine lettuce and tomatoes.

I must say that it felt really good to do this blog entry. As always, my family enjoyed this meal with gusto and I felt even happier seeing them take leftovers with them to work as well. That egg fried rice was truly delicious! (And yes, it does feel good to blog again, hahaaa!)

Huge thanks goes to Felix for getting me back into the swing of things, and it hope that this will be the first of more to come for 2013. Thank you so much for viewing my new entry and take care, my friends.

And like I always say, don’t forget to mind the pot!